
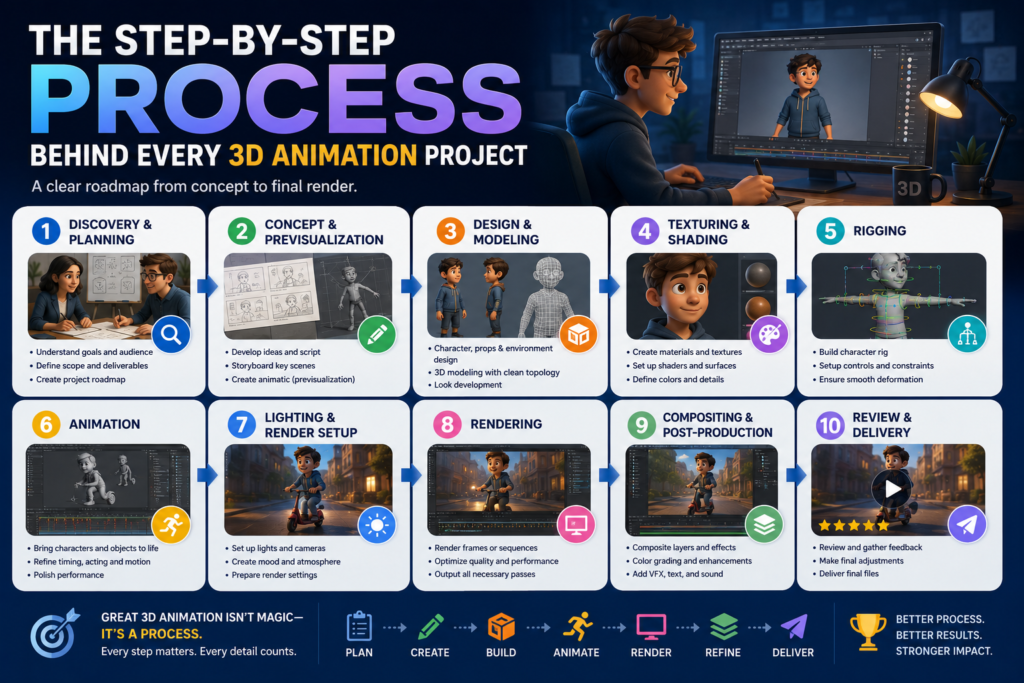
Every 3D animation project — whether it is a 15-second product spin for an e-commerce brand or a 90-second cinematic commercial for an enterprise product launch — moves through the same fundamental sequence of production phases. The duration of each phase varies with the scope and complexity of the project. The discipline required at each phase is constant.
Most businesses that commission 3D animation for the first time have no clear picture of what happens between the initial brief and the delivery of the final file. That uncertainty produces misaligned expectations: about timeline, about the nature of client involvement, about when changes can be made without cost consequences, and about what the output will actually look like at each stage of the process.
This article removes that uncertainty. It walks through every stage of a professional 3D animation production — what happens, who is responsible, where you as the client are involved, and what decisions made at each stage determine the quality of the final deliverable.
Phase 1: Discovery and Brief Development

Every professional 3D animation engagement begins with discovery — a structured conversation between studio and client designed to ensure that both parties are aligned on what is being made, why, for whom, and to what standard, before any production work begins.
A thorough discovery process covers the project’s commercial objective, target audience, visual style reference, platform and format requirements, timeline constraints, budget parameters, and any existing brand assets that the production must align with. The output of discovery is a written brief that both parties agree captures the scope of the project accurately.
The quality of this brief is the single most reliable predictor of project outcome. Briefs that are specific, referenced, and commercially grounded produce projects that run efficiently and deliver the intended result. Briefs that are vague, aspirational, or underdefined produce projects that accumulate revision cycles and drift from their original objectives.
| The brief is not a formality — it is the contract between commercial intent and creative execution. Every hour invested in making it specific and accurate saves multiple hours of production correction later. |
Phase 2: Concept Development and Script
For narrative animations — explainers, brand films, character-led content — the concept and script phase translates the brief into a structured narrative plan. The script defines what happens in the animation, in what order, for how long, with what voiceover or on-screen text, and to what emotional or informational end.
For non-narrative productions — product visualizations, architectural walkthroughs, logo animations — a shot list and creative direction document serves the same function: defining what the animation will show, from what angles, in what sequence, with what lighting and environmental treatment.
Client approval of the script or shot list is required before the production moves forward. Changes to narrative direction or shot composition after this point carry cost implications that a script-level change does not.
Phase 3: Storyboard and Animatic

The storyboard translates the approved script into a sequence of visual frames — a panel-by-panel sketch of what each scene will look like. It establishes camera angles, character or product positioning, scene composition, and the basic visual logic of the animation. A storyboard is the cheapest version of the final animation — every creative decision represented in it can be changed without significant production cost.
The animatic takes the storyboard further: a rough timed version of the animation, typically produced with simple placeholder geometry or the storyboard frames themselves, assembled to the timing of the approved script and a guide track voiceover. The animatic gives the client a genuine sense of how the animation will feel — its pacing, rhythm, and narrative flow — before any high-quality 3D work begins.
This is the most important client review milestone in the entire production. Changes made at animatic stage are inexpensive. The same changes made after modeling, texturing, rigging, and animation are complete are expensive — sometimes prohibitively so. Clients who engage seriously and decisively at animatic review consistently get better outcomes at lower total cost.
Phase 4: 3D Modeling
With the animatic approved, modeling begins. 3D artists build digital representations of every object, character, environment, and prop that will appear in the animation. The geometric complexity of each model is calibrated to its role in the production: objects that appear close to camera and in clear focus require high-density, detail-rich geometry; background elements can be built more efficiently.
For product animations, this phase establishes the visual accuracy of the product’s representation. Reference photography, technical specifications, and CAD files are used to ensure the model correctly reflects the physical product’s proportions, surface features, and design details. The more complete and accurate the product reference provided at this stage, the more accurate and efficient the modeling process will be.
Phase 5: Rigging

Rigging applies to any element of the animation that needs to move in a controlled, physically plausible way — characters, creatures, mechanical assemblies, products with moving components, or any object that deforms. The rigger constructs the internal skeleton and control system that the animator will use to pose and move the asset.
The quality of the rig directly constrains the quality of the animation it enables. A well-built rig allows the animator to achieve precise, naturalistic motion with efficient control. A poorly built rig fights the animator at every frame — producing motion that is mechanical and unconvincing regardless of the animator’s skill.
Phase 6: Texturing and Shading
Texturing defines the surface properties of every material in the scene — the visual characteristics that determine how each surface responds to light. Color, reflectivity, roughness, translucency, surface microstructure, and fine detail are all defined in this phase through a combination of hand-painted texture maps and procedurally generated material properties.
For photorealistic productions, the texturing phase is where the visual difference between a production that looks like 3D animation and one that looks like photography is established. Accurate material representation — the subtle grain of brushed metal, the subsurface scattering of skin, the translucency of colored resin — requires both technical precision and significant production time. This phase is frequently underestimated by clients reviewing timeline estimates.
Phase 7: Lighting

Lighting is simultaneously the most technically demanding and most visually consequential phase of the production. Virtual lights are placed and configured to simulate the intended illumination environment — whether that is a controlled studio setting, natural daylight, atmospheric environment lighting, or a stylized branded environment.
The lighting setup determines the mood and emotional register of the animation. A premium product should be lit to reveal the quality of its materials. A brand film’s environments should be lit to reinforce the emotional narrative of the scene. Character animation requires lighting that supports the performance — making the character’s face readable and emotionally present.
Phase 8: Animation
With the scene fully lit and all assets in place, the animation phase begins. Animators set keyframes — defining the position, orientation, and state of every animated element at specific moments — and refine the motion curves between those keyframes to produce movement that is natural, physically plausible, and expressively appropriate to the brief.
Animation typically proceeds in two passes: blocking, where the major poses and key movements are established at a rough level, followed by spline refinement, where the timing and nuance of the motion are developed into the final result. Client review of blocking is recommended for productions with significant character performance or complex camera choreography.
Phase 9: Rendering
Rendering is the computational phase in which the rendering engine calculates the final color of every pixel in every frame of the animation, based on the geometry, materials, lighting, and camera settings established in the preceding phases. For photorealistic productions, this calculation is intensive — each frame may require significant compute time, depending on the complexity of the scene and the quality settings required.
Professional studios manage rendering on dedicated render farm infrastructure — arrays of compute machines that process frames in parallel, allowing high-quality renders to be completed within commercial production timelines. Access to render farm infrastructure is one of the practical differentiators between professional studio production and solo freelance work.
Phase 10: Compositing and Post-Production
Rendered frames arrive in the compositing phase as layered image sequences — separate passes for beauty, shadows, reflections, ambient occlusion, and other elements — that the compositor combines, adjusts, and grades to produce the final image. Color grading refines the visual tone of the animation. Motion graphics, text, and branding elements are composited over the 3D renders. Visual effects elements — lens flares, depth of field refinement, atmospheric effects — may be added at this stage.
Sound design — music, voiceover, and audio effects — is mixed and synchronized to the picture. Final audio and picture are married and exported in the delivery formats required for each intended platform.
Phase 11: Delivery and Asset Handover
Final delivery involves exporting the completed production in the formats, resolutions, color specifications, and codec settings required for every intended distribution channel. A professional studio will have standard delivery templates for web, social media, broadcast, digital advertising, and presentation use. The deliverable package should also include a high-resolution master and, where contractually agreed, the underlying 3D project files.
| Production Phase | Typical Duration (Standard Professional Project) |
| Discovery and brief development | 3–5 business days |
| Concept, script, and shot list | 3–7 business days |
| Storyboard and animatic | 5–10 business days |
| 3D modeling | 1–4 weeks (dependent on asset complexity) |
| Rigging (if applicable) | 1–3 weeks |
| Texturing and shading | 1–3 weeks |
| Lighting setup | 3–7 business days |
| Animation | 2–6 weeks (dependent on complexity and duration) |
| Rendering | 3–10 business days |
| Compositing and post-production | 1–2 weeks |
| Delivery and revisions | 3–7 business days |
These ranges reflect a professional studio production at standard commercial quality. Cinematic and enterprise productions at higher complexity levels will sit at the upper end of each range or beyond it. Compressed timelines are achievable for some project types but carry cost premiums that reflect the additional resource allocation required.
Know the Process, Get a Better Outcome
Clients who understand the production process make better decisions at every stage of it. They invest more in the brief, engage more decisively at animatic review, provide more useful feedback at work-in-progress milestones, and arrive at delivery with fewer surprises and stronger results.
3D Animation US produces professional 3D animation for businesses and agencies across the United States. Contact our team to discuss your project — we will walk you through exactly what the process looks like for your specific brief and timeline.